16 Kitchen Tile Ideas for a Stunning Backsplash and Floor Makeover
June 30, 2026 · 14 min read

Kitchen tiles are the surface that defines a kitchen's character more than almost any other element.
They're seen from every angle, at every time of day, under natural and artificial light simultaneously. They must be beautiful, durable, easy to clean, and coherent with the cabinet, worktop, and fixture choices.
These 16 kitchen tile ideas cover every category — from handmade zellige and terracotta to bold geometric patterns and sleek large format slabs — with specific guidance on material choice, grout, installation method, and the exact combinations that work in 2026.
Kitchen Tile Basics: What to Know Before You Choose
The kitchen backsplash and the kitchen floor have different technical requirements. Understanding the difference prevents costly mistakes.
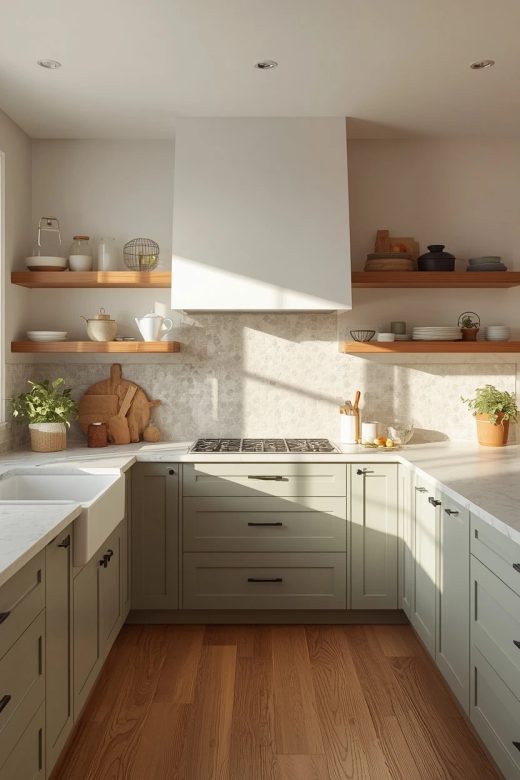
Backsplash tiles: Need to be easy to clean and heat-resistant near the hob. No minimum slip rating required. Wide creative freedom — almost any tile format works.
Kitchen floor tiles: Must carry a minimum R9 wet slip rating. Must be hard-wearing enough for high foot traffic. Grout lines should be filled with an epoxy or grout sealer to prevent staining from food spillage.
Grout: Always use unsanded grout for joints under 3mm. Sanded grout for joints over 3mm. Epoxy grout for kitchen floors where stain resistance is critical.
Idea 1: Zellige Backsplash — The 2026 Defining Choice
Zellige — hand-cut Moroccan glazed tile with characteristic glaze variation and slight surface irregularity — is the most sought-after kitchen backsplash tile of 2026. Its handcrafted quality, the way it catches light, and its inherent uniqueness make it the backsplash that makes a kitchen feel genuinely special.
Why zellige is different: Each piece is hand-cut, meaning no two are identical. The glaze is applied by hand, meaning each tile has its own tonal variation. The irregular surface catches light from different directions throughout the day, making the backsplash read as alive rather than static.
2026 zellige colours: Warm sage green, warm ivory, warm terracotta, and deep teal are the leading choices. Sage green with cream cabinets and brass fixtures is the single most photographed kitchen combination of 2026.
Grout: A warm putty or sand grout that disappears into the tile palette. Never white grout with zellige — the contrast kills the handmade effect.

Idea 2: Classic White Metro Tile — Timeless and Updated
The white metro tile (75x150mm brick format porcelain or ceramic) is the most enduring kitchen backsplash tile in contemporary domestic design. What changes across the years is not the tile but the grout, the layout, and the cabinet combination.
2026 update: Moving away from the white-tile-white-grout combination (which reads as clinical) toward white metro with a warm putty or warm grey grout that reveals the pattern. Or a coloured metro in warm cream or pale sage rather than pure white.
Layout variation: The standard horizontal brick bond is the classic. Vertical stack (tiles laid portrait, stacked directly above each other) is the contemporary update — it reads as more graphic and more European.
Dark grout option: Dark charcoal or deep grey grout with white metro creates the most graphic and most design-forward version of this classic combination.

⭐ Pro Tip
Always order a sample tile and hold it against your cabinet doors, countertop, and fixture in the actual kitchen before ordering.
Kitchen tiles look completely different in a showroom with showroom lighting than they do in your kitchen under a combination of north-facing natural light and overhead ceiling light.
The tile you love in the showroom may be too cool, too warm, or read too similarly to your cabinet colour in your actual kitchen.
Order a minimum 30x30cm sample and live with it for 48 hours before committing.
Idea 3: Handmade Terracotta Kitchen Floor
Handmade terracotta floor tiles — warm, earthy, and inherently imperfect — create the most characterful and most warm kitchen floor available. They have been used in Mediterranean and French farmhouse kitchens for centuries because they improve with age and use.
Sealing requirement: Terracotta must be sealed before grouting and annually thereafter. Use a penetrating terracotta sealer. Unsealed terracotta stains permanently from oils and food spillage — this is non-negotiable in a kitchen.
Format: Square 20x20cm or 25x25cm tiles for most kitchens. Larger 30x30cm or 40x40cm for larger kitchen spaces.
Grout: A warm sand grout that coordinates with the tile. Terracotta with white grout creates a jarring contrast. The grout should disappear into the tile palette.

Idea 4: Bold Encaustic Cement Backsplash
Encaustic cement tiles — with their richly pigmented geometric and floral patterns — used as a kitchen backsplash create the boldest and most distinctive kitchen design statement available.
Why the backsplash works better than the floor: In a kitchen, encaustic cement tiles on the backsplash give you the full visual impact of the pattern at eye level, where it can be appreciated, without the maintenance burden of an unsealed porous surface underfoot.
Best cabinet pairing: Plain, solid-colour cabinets that let the tile pattern do the work. White, sage green, or deep navy cabinets with a bold geometric backsplash work. Busy cabinet hardware or patterned countertops with an encaustic backsplash create visual competition.

Idea 5: Large Format Slab Backsplash
A single large ceramic or porcelain slab — covering the entire backsplash area in one piece, with no grout lines — creates the cleanest and most minimal kitchen backsplash available. Zero grout lines means zero cleaning difficulty.
Materials: Large format porcelain slabs (120x260cm panels) in marble-effect, stone-effect, or concrete-effect. Or real stone (marble or quartzite) slabs bookmatched for a mirrored vein pattern.
The grout-free advantage: In a kitchen where cooking happens daily, eliminating grout joints from the backsplash eliminates the most difficult-to-clean surface in the room. A large slab wipes clean in one stroke.
Installation: Large format slabs require a fully flat, structurally sound substrate and a specialist tiler experienced with large format materials. This is not a DIY installation.

Idea 6: Herringbone Metro Backsplash
Standard metro tiles laid in a herringbone pattern — rather than the standard brick bond — create significantly more visual interest from the same tile at minimal extra installation cost.
The pattern dynamic: A herringbone arrangement adds directional movement to the backsplash that a horizontal brick bond cannot achieve. It draws the eye across the wall and makes the backsplash zone feel more expansive.
Colour direction for 2026: Warm cream metro in herringbone. Pale sage green in herringbone. Or a deep charcoal metro in herringbone against white cabinets for maximum graphic contrast.
Grout: A contrasting grout makes the herringbone pattern highly visible and bold. A matching grout creates a subtle, textural effect. Both are valid.

Idea 7: Warm Travertine Kitchen Floor
Travertine floor tiles in the kitchen bring a warmth and natural variation to the floor that porcelain cannot fully replicate. The pitted, layered surface of genuine travertine, properly sealed, creates the most luxurious kitchen floor available.
Sealing: Travertine is porous. Seal with a penetrating stone sealer before grouting, before use, and annually thereafter. A properly sealed travertine kitchen floor is practical and easy to maintain.
Format: Large format (60x60cm or 30x60cm) travertine tiles with filled holes (the characteristic travertine pitting, filled and polished flush) for the cleanest, most contemporary look.
Pairing: Travertine floor with warm white cabinets, brass fixtures, and a simple metro or zellige backsplash. The warm honey tones of travertine suit warm palette kitchens and clash with cool blue-grey cabinetry.

⚠️ Important Warning
All kitchen floor tiles must be sealed and maintained appropriately for the specific tile material.
Terracotta, travertine, limestone, and natural stone kitchen floor tiles are porous. Unsealed or poorly maintained porous tiles in a kitchen absorb cooking oil, food spillage, and cleaning products permanently.
Re-sealing is required annually for natural stone and terracotta kitchen floors — this is not optional maintenance but a requirement of the material.
Before choosing a natural stone or terracotta kitchen floor, confirm you are prepared to commit to the annual sealing maintenance it requires.
Idea 8: Gloss White Large Format Floor
Large format gloss white porcelain tiles on the kitchen floor — 60x60cm or 60x120cm — create the brightest and most expansive kitchen floor available. Gloss white tiles reflect light upward, making low-lit or small kitchens feel significantly more open.
Why gloss in the kitchen: Unlike bathrooms (where gloss floors become slip hazards when wet), kitchen floors don't typically have standing water. Gloss porcelain in a kitchen provides the light-reflection benefit with manageable cleaning demands.
Practical note: Gloss white kitchen floors show footprints, dust, and marks more visibly than matte tiles. They require more frequent sweeping but clean very quickly with a damp mop.
Grout: White grout with white tiles — the goal is a seamless expanse that reads as one continuous reflective surface.

Idea 9: Dark Tile Backsplash for Drama
A dark backsplash — in charcoal, deep slate, navy, or near-black tile — against light cabinets creates the most dramatic kitchen backdrop available and provides the strongest possible contrast with the countertop and cabinet colours.
Best tile types for dark backsplash: Handmade charcoal metro. Dark slate subway in a natural finish. Deep navy zellige. Near-black matte ceramic in a large format.
Cabinet pairing: White or cream cabinets with a dark backsplash create the highest contrast kitchen aesthetic. Natural timber or sage cabinets with a dark backsplash create a warmer, more sophisticated combination.
Lighting requirement: A dark backsplash needs good under-cabinet lighting to prevent the kitchen feeling dim. LED strips under the upper cabinets directed at the backsplash surface make dark tiles look dramatic rather than depressing.

Idea 10: Full Height Backsplash to the Ceiling
Tiling the backsplash from the countertop to the ceiling — rather than the standard splashback height of 50–60cm — creates the most architectural and most visually dramatic kitchen treatment.
Why full height works: It eliminates the painted wall zone above the upper cabinets (which is difficult to keep clean and often awkward to paint). It makes the ceiling feel higher. And it creates a complete, finished quality that a standard-height backsplash cannot achieve.
Tile continuity: The most effective full-height application uses the same tile throughout, without a change of colour or pattern at upper cabinet height. One continuous surface from counter to ceiling reads as intentional and designed.

Idea 11: Hob Splashback Feature Tile
Rather than tiling the entire backsplash in one material, tile the zone directly behind the hob in a statement tile and use a simpler, more restrained tile for the rest of the backsplash.
The hierarchy: Behind the hob is the visual centre of the kitchen backsplash. A statement tile in this zone — a bold encaustic pattern, a richly coloured zellige, or a dramatic marble slab — draws the eye to the cooking centre while keeping the rest of the backsplash simple and less expensive.
Transition: The transition between the feature tile and the main backsplash tile should be marked with a thin trim piece (a brass strip, a slim pencil tile) or by a natural break at a cabinet edge.

Idea 12: Warm Wood-Effect Kitchen Floor
A wood-effect porcelain plank tile on the kitchen floor provides the warmth and visual character of timber flooring with the waterproof, stain-resistant performance that natural timber cannot provide in a kitchen.
Why wood-effect in the kitchen: Genuine timber swells and deteriorates in kitchen humidity and water spillage. A high-quality porcelain wood-effect delivers the warmth of timber at the performance standard a kitchen demands.
2026 direction: Warm oak tones, honey ash, and warm walnut effects in long plank format (20x120cm or 20x150cm). Replacing the cool grey and light bleached wood-effect that dominated 2018–2022.

Idea 13: Penny Round Hob Niche Tile
Using penny round mosaic tiles specifically in a recessed hob niche or a small defined area — rather than across the full backsplash — creates a textural focal point that reads as a deliberate design detail.
The niche application: If the kitchen has an inset hob alcove or a range recess, lining the inside of this niche with penny round mosaic tiles in a contrasting colour creates a deeply considered detail that makes the kitchen feel designed.
Colours: Warm cream penny rounds in a sage green kitchen. Sage green rounds in a cream kitchen. Terracotta rounds in a white kitchen. The contrast between the niche tile and the surrounding backsplash creates the focal point.

Idea 14: Terrazzo Kitchen Floor
Terrazzo floor tiles in the kitchen bring the most visually complex and most contemporary floor surface to a kitchen environment. Each terrazzo tile is unique — the stone chip pattern varies across every tile in the run.
Format: Large format terrazzo (60x60cm) with a warm chip palette for most kitchens. Or poured-in-situ real terrazzo for a completely seamless, grout-free kitchen floor (specialist installation required).
2026 chip palette: Warm cream base with terracotta, caramel, and sage chips — replacing the white base with grey and black chips of the previous era.

Idea 15: Glass Mosaic Kitchen Backsplash
Glass mosaic tiles — small squares of coloured or metallic glass — create the most light-reactive kitchen backsplash surface. Each tile reflects light in a slightly different direction, creating a shimmering, jewel-like quality that changes completely as the kitchen light changes throughout the day.
Best colour applications: Warm gold or bronze glass mosaic as a metallic accent behind the hob. Pale sea green glass mosaic for a coastal kitchen. Clear glass mosaic that reflects the kitchen's colours back.
Installation: Glass mosaic tiles are applied on a mesh backing and require a thin-bed adhesive appropriate for glass. The adhesive colour shows through transparent tiles — use a white or tile-coloured adhesive.

Idea 16: Mixed Tile Height — Dado Rail Detail
Tiling two thirds of the kitchen wall height in one tile (the backsplash zone plus additional height) and finishing with a contrasting tile above a slim dado rail creates an architectural layering that most kitchens — which tile only the immediate backsplash zone — never achieve.
The effect: Taking tiles higher than the standard backsplash height and finishing them with a deliberate horizontal trim makes the kitchen feel more complete, more designed, and more like a considered interior space rather than a functional room.
Example: Sage zellige tiles to 130cm height (including a band of tiles above the upper cabinet tops), finished with a slim brass dado strip, with warm plaster or paint above.

📌 Important Note
Grout colour is the most commonly underestimated kitchen tile decision.
A warm ivory tile with white grout will read as a white grid pattern, with the tile pattern secondary.
The same ivory tile with a warm sand grout that closely matches the tile will read as a nearly continuous warm surface, with the pattern subtle.
Both are valid — but they produce completely different visual results from the same tile.
Always order grout samples, mix them to the correct consistency, and dry them against your tile sample before ordering the full quantity.
Kitchen Tile Planning Checklist
• Order tile samples (minimum 30x30cm) and test in the actual kitchen light for 48 hours
• Calculate area required and add 15% for cuts, waste, and future repairs
• Choose grout colour by testing a dried sample against the tile — not a wet one
• For natural stone and terracotta: purchase penetrating sealer at the same time as tiles
• For kitchen floors: confirm the R slip rating is R9 minimum
• Confirm the tiler has experience with the specific tile type (large format, glass mosaic, and natural stone all require different techniques)
• Plan under-cabinet lighting before tiling — the lighting position affects how the tile reads
• Seal kitchen floor grout lines with epoxy grout or a grout sealer for stain resistance
Frequently Asked Questions
What is the most popular kitchen tile in 2026?
Zellige in sage green or warm ivory is the single most-requested kitchen backsplash tile of 2026. Warm terracotta and herringbone metro are close seconds. For kitchen floors, warm travertine-effect porcelain and warm oak-effect plank tiles are the dominant directions.
What kitchen tiles are easiest to clean?
Large format porcelain with minimal grout lines and an epoxy grout or sealed grout. The fewer the grout lines, the easier the cleaning. A large slab backsplash with zero grout lines is the easiest kitchen tile surface to maintain.
What colour grout should I use in the kitchen?
Use a grout colour that closely matches the tile background to minimise the visible grid. Kitchen floor grout should be sealed with epoxy grout or an ongoing grout sealer for stain resistance. Never use bright white grout with warm-toned tiles — it creates jarring contrast.
Can I tile over existing kitchen tiles?
Yes, if the existing tiles are fully adhered with no hollow or loose sections. Tiling over existing tiles adds height to the surface — confirm the new tile thickness won't cause problems with electrical sockets or cabinet fitting. Grout the new tiles over the old as normal.
How high should kitchen backsplash tiles go?
Standard backsplash: countertop to the underside of upper cabinets. Full-height: countertop to the ceiling. Full-height creates a more complete, architectural look but costs more in tile and labour. For maximum impact with minimum tile area, prioritise the zone behind the hob for the feature tile.
Final Thoughts
Kitchen tiles are a long-term investment. A kitchen is typically renovated once every 10–20 years — the tile choice must work for that entire period.
Choose the tile that genuinely excites you in your kitchen's actual conditions, not in a showroom. Test it. Check the grout. Confirm the technical requirements.
A kitchen tile decision made with care and tested properly is one you'll feel good about every time you cook.