18 Kitchen Reno Ideas That Update Your Kitchen Without the Full Rebuild
June 30, 2026 · 16 min read

A kitchen reno doesn't have to mean a full demolition, a skip in the driveway, and eight weeks without a functioning kitchen.
The smartest kitchen renovations are targeted — identifying the specific elements that are limiting the kitchen's appearance or function and upgrading those specifically, rather than replacing everything.
This approach costs a fraction of a full rebuild. It can often be completed over weekends. And it frequently produces results that look like a full renovation to everyone who sees the kitchen.
These 18 kitchen reno ideas are ordered by practicality and targeted impact — the specific, executable upgrades that professionals identify first.
The Kitchen Reno Assessment Framework
Before spending a pound, identify exactly what is making the current kitchen fall short. Every kitchen has a primary constraint — the one thing that, if fixed, would transform the room most. Identify it before spending on anything else.
Is it the cabinets? The colour, the door style, or the state of the finish?
Is it the countertop? Dated laminate that makes everything else look cheap?
Is it the layout? Inadequate worktop space, poor workflow, or insufficient storage?
Is it the lighting? Poor illumination that makes the kitchen feel dim and clinical?
Is it the styling and surfaces? Accumulated clutter, dated accessories, and wrong tile?
The answer determines the priority. The biggest bang for the kitchen reno pound always comes from fixing the primary constraint first.
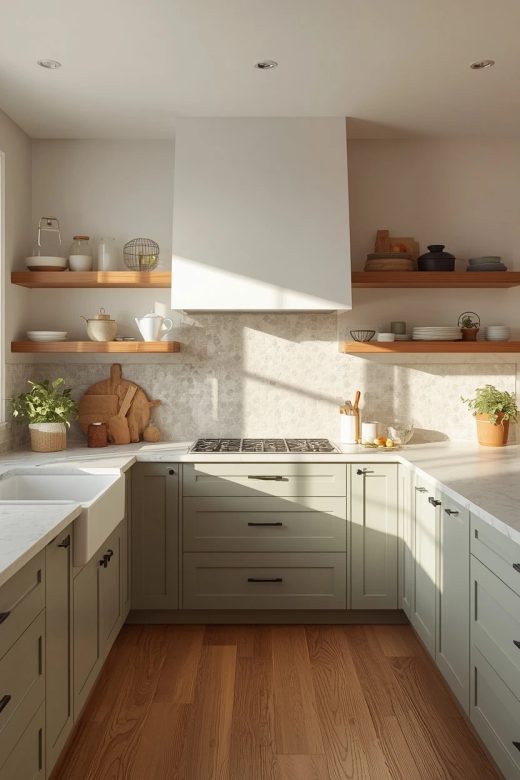
Idea 1: Spray-Paint the Cabinet Doors to a Professional Finish
Having the existing kitchen cabinet doors spray-painted by a professional spray-painting company delivers a showroom-quality finish at a fraction of new cabinet cost — and without a full kitchen demolition.
How it works: The company removes all doors and drawer fronts, takes them to a spray facility, applies a primer and two to three coats of automotive-grade enamel, and reinstalls. The finish is harder and more consistent than brush-applied paint.
Timeline: Most spray-paint companies complete the process in two to five days. The kitchen is usable during this time (the carcasses remain in place).
Cost: £400–£900 for a typical kitchen. Versus £3,000–£15,000 for new cabinets.
2026 spray-paint colours: Sage green (the most requested colour). Warm cream. Deep navy. Forest green. Warm charcoal.

Idea 2: Tile Over the Existing Backsplash
Tiling directly over the existing kitchen backsplash tile — without removing it — saves two to three days of demolition labour and avoids the mess, dust, and potential damage of tile removal.
When you can tile over: The existing tiles are fully adhered (no hollow or loose sections — tap each one to check). The thickness of the new tile over the old doesn't cause problems with socket heights or cabinet fits.
Preparation: Clean the existing tile thoroughly with a degreaser. Sand the tile surface lightly to improve adhesion. Apply a bonding primer (SBR or similar) before the tile adhesive. Use a flexible adhesive appropriate for the new tile type.
Limitations: Can only add one new tile layer over the existing. Two layers over original would create too much thickness. This is not appropriate where the tiles are already a second layer.

⭐ Pro Tip
The single most underestimated kitchen reno investment is under-cabinet lighting.
Most kitchens have counter space lit from above by ceiling downlights — which creates a shadow from the upper cabinets directly on the work surface.
A warm white LED strip under each upper cabinet section, connected to a separate switch from the ceiling lights, illuminates the counter directly and eliminates the shadow.
Cost: under £100 for a typical kitchen in materials. Impact: the kitchen immediately looks more considered, the counter is properly lit for food prep, and the space feels warmer.
Idea 3: Add Under-Cabinet LED Task Lighting
Under-cabinet LED lighting is the most practical and most overlooked kitchen reno upgrade. It directly solves the most common kitchen lighting problem — a shadow cast on the counter by the upper cabinets under overhead lights — and adds warm ambient fill at counter level.
Installation: Peel-and-stick LED strip (simple, no electrician required, plugs into a standard socket via a cable run behind the cabinet). Or hard-wired LED channels (requires an electrician but gives the cleanest installation with no visible cables or plugs).
Specification: Warm white at 3000K (warm enough to be pleasant, accurate enough for food colour assessment). Minimum 400–500 lumens per metre. Dimmable if on a dimmer circuit.
Positioning: Mount the strip at the front edge of the cabinet underside — not at the back. Front-edge mounting illuminates the full counter surface without the upper cabinet casting a shadow on the strip itself.

Idea 4: Replace the Countertop Independently
A kitchen countertop can be replaced without touching the cabinets, the backsplash tile, or the flooring. This targeted reno removes the most visible dated surface in most kitchens and replaces it with a material that immediately changes the kitchen's apparent quality.
The process: A stone or laminate supplier measures the existing countertop dimensions. New countertop is cut to size in the factory. Existing countertop is removed (typically a half-day job). New countertop is fitted, including cutting the sink opening. Total disruption: one day.
Best countertop choices for a kitchen reno: Quartz (most durable and most popular). Honed marble (beautiful but requires care). Compact laminate in a stone-effect (most affordable, surprisingly convincing). Solid timber (warmest, suits farmhouse kitchens, requires annual oiling).

Idea 5: Update the Kitchen Tap and Sink
Replacing the kitchen tap is the smallest kitchen reno intervention with the most disproportionate impact. The tap is touched multiple times every day, is at eye level when working at the sink, and immediately signals the kitchen's quality level.
Impact of the tap upgrade: A chrome swan-neck mixer tap in a dated kitchen reads as generic. The same kitchen with a warm brass bridge tap or a matte black industrial-style tap reads as considered and designed.
Cost: A quality warm brass bridge tap: £100–£350. A matte black industrial mixer: £80–£250. Plumber to change the tap: £80–£150. Total: under £500 for a change that people notice immediately.
Adding a butler's sink simultaneously: If the plumber is already under the sink, adding a white ceramic butler's sink at the same time costs only the sink price plus the additional time — a highly efficient combined reno.

Idea 6: New Kitchen Flooring Over the Existing
Laying new flooring directly over the existing kitchen floor — without removal — is the quickest flooring reno in any room. Most thin vinyl and LVT products can be laid directly over existing tiles or timber, saving significant time and mess.
Products that work: Luxury Vinyl Tile (LVT) in a click-lock system can be laid over most flat existing surfaces with a maximum 3mm height variation. It adds only 4–6mm to the floor height — typically manageable for kitchen doors and appliances.
When not to overlay: If the existing floor has hollow sections, rising damp, or significant height variation. In these cases, removal is necessary regardless.
2026 direction: Warm oak plank LVT (replacing the grey and light wood tones). Warm stone-effect large tile LVT. Herringbone LVT in warm cream for a period kitchen.

Idea 7: The Kitchen Reno That Changes the Atmosphere — New Pendant
Replacing a flat plastic ceiling rose or a basic downlight with a statement pendant above the kitchen island or dining area is the reno that most changes the kitchen's atmosphere at the lowest possible trade cost.
Why the pendant matters: A pendant light above the island or dining table creates a focal point, defines the zone, and provides warmth that ceiling downlights never achieve. It signals that the kitchen was designed rather than merely installed.
The electrician requirement: Changing a ceiling pendant requires a Part P-qualified electrician in the UK if any new wiring is needed. If a pendant is being swapped directly for an existing fitting (same position, same wiring), it's a simple swap that most competent DIYers can manage safely.
2026 pendant direction: A large rattan dome (warm, organic). A warm brass cage pendant. A smoked glass globe. All at 2700K with a visible Edison filament bulb.

⚠️ Important Warning
Any kitchen reno that involves moving or adding gas connections must be carried out by a Gas Safe registered engineer in the UK, or the equivalent certified professional in your country.
This includes: moving a gas hob. Replacing a gas oven. Adding a gas connection for a new range cooker. Any modification to a gas supply line.
Gas work carried out by an unregistered person is illegal, voids your home insurance, and poses a genuine danger to everyone in the property.
Always ask for the Gas Safe registration certificate and check it online before any work begins.
Idea 8: Add a Kitchen Island With a Butcher Block Top
A freestanding kitchen island — with a warm butcher block or timber top — can be added to most kitchens without any building work. A quality freestanding island on castors costs £300–£800 and can be positioned and repositioned freely.
What it adds: Additional prep surface. Additional storage (drawers or shelving below). A social zone (add two stools to the opposite end). And visual warmth — the warm timber top immediately improves the look of any kitchen it's placed in.
Sizing: The island needs 90–100cm of clear passage on all sides for comfortable movement. Measure carefully before purchasing. A kitchen with less than 90cm available around the island feels cramped.

Idea 9: Declutter and Install a Pot Rack
Clearing the kitchen countertops of all non-essential items and installing a ceiling-mounted pot rack — to hang pots, pans, and utensils that previously occupied cabinet space — simultaneously frees counter space and adds one of the most atmospheric visual elements available in a kitchen.
The pot rack effect: A ceiling-mounted pot rack with copper or cast iron pans hanging from it is one of the most immediately evocative kitchen elements — it signals a working kitchen, a cook's kitchen, and creates warmth and character that no cabinetry alone achieves.
Structural requirement: A pot rack must be mounted into ceiling joists — the weight of the pots and the rack itself (often 15–25kg combined) is significant. Never mount into plasterboard alone.

Idea 10: New Appliances — The Functional Upgrade
Replacing dated or failing appliances — without changing the cabinet layout — is the kitchen reno that improves daily cooking function most directly. New appliances also update the kitchen's aesthetic significantly, particularly if moving from a freestanding range to an integrated hob-and-oven combination.
The hob decision: An induction hob (replacing a gas or electric coil hob) is the appliance upgrade with the most significant daily quality-of-life improvement. Induction heats faster, is safer (no open flame), and is dramatically easier to clean.
Oven upgrade: A pyrolytic self-cleaning oven eliminates the most hated kitchen cleaning task permanently. The pyrolytic function heats the oven to 500°C and reduces all residue to ash.
Cost: Quality induction hob: £300–£800. Integrated pyrolytic oven: £400–£1,200. Combined supply and installation: £800–£2,500.

Idea 11: Open Up a Serving Hatch or Window
Creating a serving hatch or window between the kitchen and an adjacent dining room — without the cost of a full wall removal — improves natural light, improves the visual connection between rooms, and dramatically improves serving and communication between the spaces.
How it works: A hatch is simply a smaller opening than a full wall removal. Typically 60–90cm wide and 50–60cm tall, at counter height. In most cases a serving hatch avoids a structural beam requirement (which full wall removal often triggers), making it significantly less expensive.
Cost: A serving hatch opening in a non-load-bearing wall: £400–£1,200 including plastering and finishing. Versus £3,000–£8,000+ for a full wall removal.

Idea 12: Refresh the Kitchen With New Accessories
Replacing the kitchen's visible accessories — the kettle, the toaster, the bread bin, the canister set, the knife block — with a coordinated set in one colour family instantly makes a kitchen look more considered.
The accessories upgrade: All kitchen small appliances and accessories visible on the counter in the same colour family (all cream and timber, or all black, or all stainless). The coordination reads as intentional design rather than accumulated purchase decisions.
The rule: If the accessories don't coordinate, they should not be on the counter. Storage space for non-coordinating items is always preferable to visible mismatched items.
Cost: A coordinated kettle, toaster, and canister set: £80–£300. The visual impact of the coordination: immediate and significant.

Idea 13: Add a Splashback to a Previously Untiled Zone
If the kitchen has areas of wall between or above cabinets that are painted rather than tiled — particularly near the hob or sink — adding tile to these zones completes the kitchen in a way that many older fitted kitchens never achieved.
The hob zone: The wall area directly behind the hob is the highest-priority tiling zone in any kitchen. Cooking produces grease and moisture that marks painted walls permanently within months. Tile here protects the wall and completes the kitchen.
The sink zone: The wall behind and above the sink receives water splashback. Tiling this zone prevents the water marks and wall deterioration that affect untiled sink walls.

Idea 14: Regrout the Existing Tiles
If the existing kitchen tiles are still in good condition but the grout is stained, discoloured, or crumbling, regrouting — removing the old grout and replacing it — completely transforms the tiles' appearance without any tile replacement.
The impact: Kitchen tile grout that has darkened or stained with cooking residue makes perfectly good tiles look dated and unhygienic. Fresh grout in a clean, coordinating colour makes the same tiles look as if they were recently installed.
Process: Remove old grout with an angle grinder and grout rake attachment or a manual grout rake. Vacuum thoroughly. Apply new grout at the correct joint width. Clean excess from tiles. Seal once dry.
Cost: Regrouting a standard kitchen backsplash: professional cost £200–£500. DIY cost £20–£50 in materials.

Idea 15: The Smart Kitchen Storage Upgrade
Adding pull-out drawers inside existing base cabinets, installing a corner carousel, or adding door-mounted storage to existing cabinet doors upgrades the function of existing storage without any visible change to the kitchen from the outside.
Pull-out drawers inside base cabinets: The most universally transformative internal storage upgrade. Base cabinet shelves require crouching and reaching to access the back. Pull-out drawers bring everything to the front at waist height.
Internal pull-out suppliers: Blum, Häfele, and IKEA all supply pull-out basket and drawer systems that fit inside most standard cabinet widths. Most can be installed without professional help.
Cost: A full set of internal pull-out upgrades for a typical kitchen: £200–£600 in materials plus a day of installation time.

Idea 16: Convert the Kitchen to Open Plan — Partial Opening
If a full wall removal is too costly or structurally too complex, creating a partial opening — removing the upper portion of a dividing wall to create a breakfast bar or servery height opening — achieves 70% of the open-plan effect at 30% of the cost.
The partial opening: A half-wall at counter height (90cm) with the space above it open creates a direct connection between the kitchen and the adjacent room without the structural complexity of full wall removal.
The worktop extension: The top of the half-wall becomes a breakfast bar counter when fitted with a stone or timber worktop. Add three bar stools on the dining side for casual seating.
Cost: A partial wall opening at counter height in a non-load-bearing wall with a worktop added: £1,500–£4,000. Versus £5,000–£12,000+ for a full wall removal.

Idea 17: The Kitchen Reno Weekend Project — Complete List
These targeted kitchen reno upgrades can each be completed in a single weekend without professional help:
• Paint cabinet doors in a new colour (preparation and two coats over two days)
• Replace all cabinet hardware (handles and knobs — a screwdriver job taking two to three hours)
• Install peel-and-stick under-cabinet LED strip lighting (plug-in installation — one afternoon)
• Replace switch plates with brushed brass or matte black alternatives (a screwdriver job)
• Regrout the existing tile backsplash (manual grout rake, new grout, one day)
• Install internal pull-out drawers in base cabinets (flat-pack assembly and fitting, one day)
• Declutter and reorganise all surfaces (no tools, one morning)
• Add a large kitchen plant — a lemon tree, olive tree, or large trailing pothos (immediate)

Idea 18: The Kitchen Reno That Pays Back — Focus on What Buyers See
If the kitchen reno is partly motivated by adding property value, focus the investment on the changes buyers notice and respond to most consistently:
The countertop: The first surface buyers touch and examine. A genuine stone countertop (quartz or honed marble) adds immediately perceived value that laminate cannot replicate regardless of the pattern.
The tap and sink: Buyers run the taps. A quality warm brass or stainless mixer tap and a quality sink signal a kitchen that has been invested in.
The lighting: Buyers view kitchens with overhead lights on. A kitchen with warm layered lighting reads as a room to spend time in. A kitchen with a single fluorescent tube reads as a room to get through.
The storage: Buyers open cabinets. Pull-out drawers, organised internal storage, and full-height cabinetry that uses all available vertical space signal quality of thought and planning.

📌 Important Note
Every kitchen reno is a balance between current enjoyment and future return.
A kitchen reno that you love and use every day for five years delivers its return in quality of life, not just in property value.
The kitchen that makes cooking more enjoyable, eating more sociable, and the daily routine more pleasant is worth every pound spent — regardless of what the property valuer says.
Don't renovate a kitchen only for a potential future buyer. Renovate it for the person who will cook in it tomorrow morning.
Kitchen Reno Priority Checklist
• Identify the primary constraint: what is most limiting about the current kitchen?
• Fix the primary constraint first — don't skip to aesthetics while the function is broken
• Start with the free fixes: declutter, rearrange, clean
• Then the quick wins: hardware, accessories, lighting
• Then the mid-range targeted upgrades: countertop, backsplash, tap
• Finally, the major changes if budget allows: cabinet paint/replacement, flooring, layout
• Get at least three quotes for any trade work over £500
• Always include a 20% contingency in the reno budget — kitchens always find something unexpected
Frequently Asked Questions
What is the most cost-effective kitchen reno?
Painting the existing cabinet doors and replacing hardware delivers the highest visual transformation per pound. Under-cabinet lighting is the highest functional improvement per pound. Combined, these two changes for under £1,000 produce kitchen results that most people would budget £5,000–£10,000 to achieve.
How do I update a kitchen without replacing the cabinets?
Paint the doors. Replace the hardware. Replace the countertop. Replace the backsplash tile. Replace the tap. Replace the flooring. These six targeted upgrades update every visible surface without touching the cabinet carcasses.
How long does a kitchen reno take?
Weekend DIY (paint, hardware, lighting, declutter): two to three days. Targeted professional trades (countertop, backsplash, flooring): three to seven days of disruption with up to three weeks for coordination and delivery. Full kitchen reno: four to eight weeks.
Can I tile over existing kitchen backsplash?
Yes, if all existing tiles are fully adhered (tap each to check for hollow sounds) and the added tile thickness doesn't cause problems with socket heights or cabinet fitting. Use a flexible adhesive and a bonding primer for best adhesion.
What kitchen reno should I do first?
The under-cabinet lighting. It costs under £100, requires no trade, can be installed in an afternoon, and immediately shows everything else in the kitchen — the cabinets, the countertop, the backsplash — at its best. Once the lighting is right, you can assess everything else more accurately.
Final Thoughts
The smartest kitchen renovations are targeted. They identify the specific constraint, address it directly, and move on.
The most expensive kitchen renovations are the ones that replace everything when only specific things needed changing — and the ones that change everything aesthetically while leaving the functional problems unsolved.
Start with the light. Fix the function. Then make it beautiful. In that order.